
5 Easy Steps on How to Paint Water Reflections and Foliage in Watercolor

Water is one of the most difficult subject to paint. In this blog post, I will show you 5 easy steps on how to paint water reflections and foliage in watercolor.
The Reference Photo
The artwork in this blog post is inspired from a nature walk I did way back in Dec 2020. I and my friends went to Lower Peirce Reservoir Park in Singapore for a morning walk and one of the nicest spots in the trail is captured in this photo. I love the trees outlining the horizon and the tranquil waters. The photo didn’t do much justice to the place, as it was so serene, I wished I stayed there to paint right on the spot.
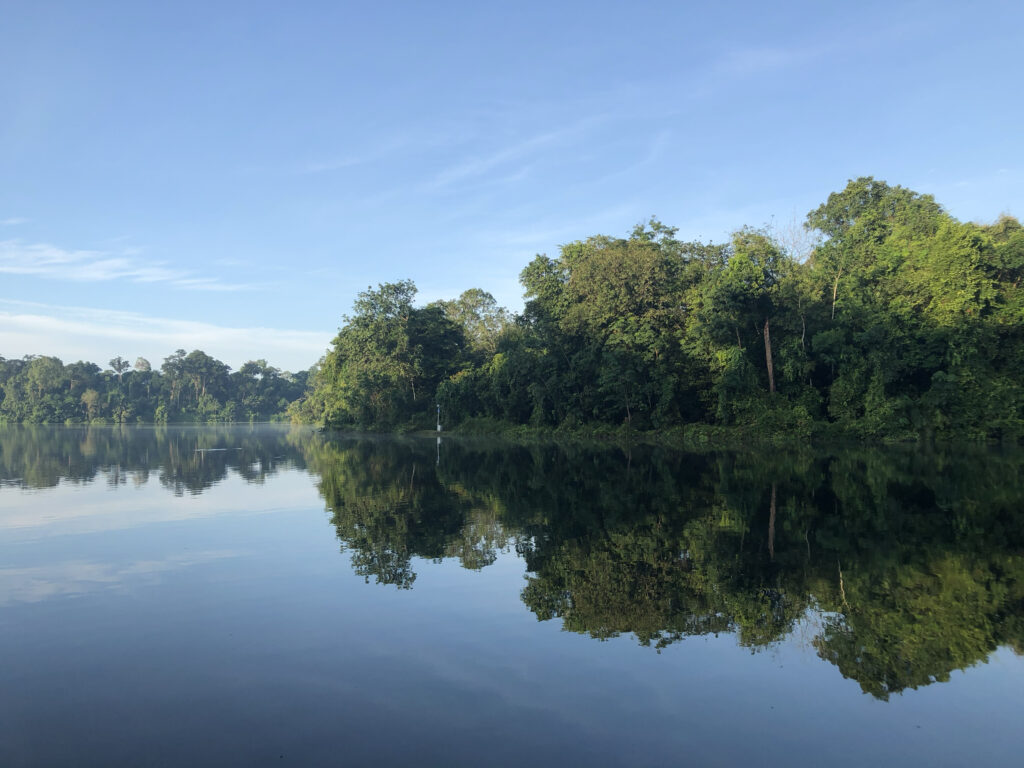
Notice that there aren't any foliage at the foreground. This is one spot where I have a clear frame for my camera, but the path where I was standing has some plants and trees and I thought of painting those at the last stages for a more framed piece.
Steps on How To Paint Water Reflections and Foliage in Watercolor
1. Painting the Sky. After securing the paper onto a board and marking the horizon with a masking tape, I painted the sky using a mixture of M. Graham Cobalt Blue and Manganese Blue Hue.
Note: It’s a clear sky and to achieve this, I need to spread the pigments on paper evenly, so I sprayed some water and tilted the paper.
2. Painting the trees along the horizon. For the trees, I used M.Graham Sap Green and to add a brighter green, I mixed it with Hansa Yellow.
Then I painted the trees, slowly building up the shadows as I go using a round foliage brush.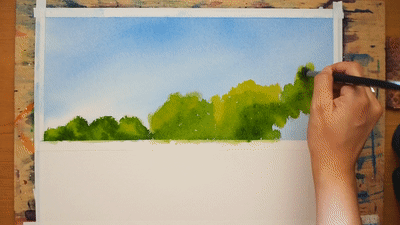
For the darkest greens, I added Payne’s Grey to the mixture.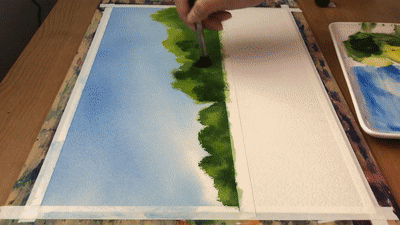
I repeat the process until I’m satisfied with it, then I removed the tape to paint the reflections.
3. Painting the Reflections. After removing the tape, I soften the horizon by adding a thicker green paint and blending it out with a clean brush.
Then I slowly painted the reflections by adding in more water and paint repeatedly until I see the shape mirroring that of the trees above, and also adding in the sky reflection at the bottom of the composition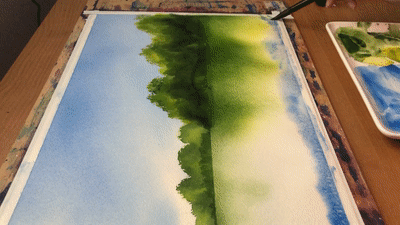
Moving back to the trees reflection, I intensified it further by adding more green.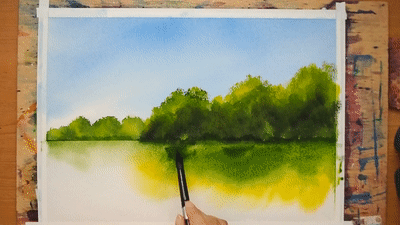
Note: See that this step involved a lot of spraying and tilting the paper. I wanted to create a fluid motion of the colour and this technique helped a lot to achieve just that.
4. Painting the branches. After painting the reflections, I added in some branches to the greenery for more details.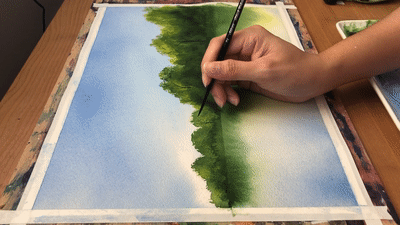
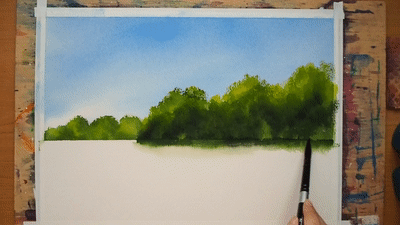
5. Painting the Foliage and the waves. To make the painting more interesting, I added in foliage at the left side of the painting. Remembering the trees that framed up the scenery as I walk in the park, I painted it in such a way that it looks like the foliage is right in front of me so I had to paint the leaves in slight detail.
Then I moved on to the water, adding waves by painting a light wash of greens in random horizontal strokes along the horizon. As I go further down, I added more blues to the waves and made the strokes slightly bigger and thicker.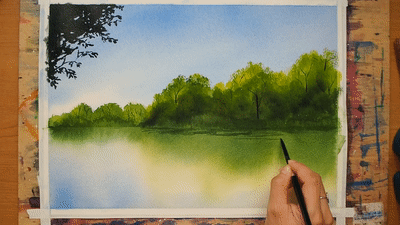
As a finishing touch, I further add foliage to the bottom and some bigger tree branches on the right side. This framed up the composition and created a nice focal point to the horizon. You may notice in some areas, I painted bigger leaves and some grass as well. This creates the perspective of the foliage being right in front of me.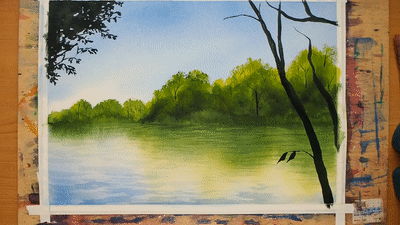
Let the painting dry, sign it, and we’re done! The painting is complete and I was very happy on how it turned out! 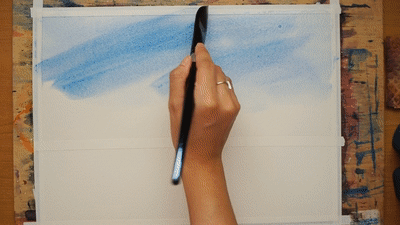
The Finished Artwork
I hope you learned everything you need to know on how to paint water reflections and foliage in watercolor! You can watch the whole process on youtube to understand more, and if you follow through my tutorial, please feel free to tag me with your painting on Instagram so I can see your artwork too! For more tutorials like this, you can browse my youtube channel! Do hit the subscribe button to stay updated with the posts!
9"x12"
Watercolor on Cotton Rough Paper (300gsm)
For more inspiration on how to paint water in watercolor, head on to the Seas and Ocean Page.
Tags: artcreativefine artGalaxygreeneryM. Grahamnature paintingoceanPortia Barucreflections in watercolorwatercolor paintingwatercolor seawaterscapewatwr reflections
Comments are closed.